Wednesday, December 28, 2011

Garter-Rib Ear Hat

GARTER-RIB EAR HAT

Here's a simple pattern for a toddler-preschooler hat that's both warm and adorable. The hat will fit a child with a 20 inch head (age 2-4), but is really stretchy so will accommodate a larger head as well. Knit in classic garter stitch but with a unique garterstitch-twist on a traditional ribbing that keeps things interesting. Practical i-cord side flaps will keep precious little ears warm while the decorative animal ears will make mothers swoon.

Materials:
1 ball of Diamond Superwash Aran in Main colour (i used colour # 1654).
1 bal of Diamond Superwash Aran in Contrast colour (i used colour # 7473).
4.5 mm 16 inch needle
5 mm 16 inch needle AND double-pointed needles for decreasing/i-cord.
optional: stitch markers to assist with the decreases.
optional: buttons for embellishment on the ears.

ABBREVIATIONS:
MC – Main Colour
CC – Contrast Colour
K – Knit
P – Purl
K2tog – Knit two together
SSK – Slip Slip Knit
CO – Cast on

gauge – 18 stitches/4 inches on 5 mm needles.

Main Body of Hat

CO 72 stitches with 4.5 mm needles with CC. begin knitting in round being careful not to twist stitches. 

knit in garter rib pattern as follows:

1st row: KKKP
2nd row: KPPP

repeat these last 2 rows a total of 8 times (16 rows).

Switch to MC and 5 mm needles.

knit in garter stitch (*knit one row, purl the next* repeat). continue for 4.5 inches from the cast-on edge, at which point you will begin decreasing.

decreases:

row 1: *knit 7, k2tog*. repeat. continue until end of round.
row 2: purl
row 3: *knit 6, k2tog*. repeat. continue until end of round.
row 4: purl
row 5: *knit 5, k2tog*. repeat. continue until end of round.
row 6: purl
row 7: *knit 4, k2tog*. repeat. continue until end of round.
row 8: purl
row 9: * knit 3, ktog*. repeat. continue until end of round.
row 10: *purl 2, p2tog*. repeat. continue until end of round.
row 11: *knit 1, k2tog*. repeat. continue until end of round.
row 12: *purl 2 tog* repeat until end of round. (8 stitches remain).

break yarn leaving a long tail and knit through the last stitches. weave in wrong side of work.

Ear Flaps:

if you look closely, you can tell where the beginning of the rows were (where the knit turned to a purl) as there is a line (a jog), or a break in the fluidity of the row. i attempted to centre this line in between the ear flaps.  with right side facing, begin the first ear flap by picking up stitches about one to one-and-a-half repeats of the garter-rib away from the beginning of the row. measure how long your ear flap ends up being (mine was 6 repeats of the garter rib). measure that distance PLUS the 1 repeat give from the centre line to determine where to start your second flap. these directions are finicky and strange so just eye-ball it the best you can.

row 1: with CC and 5 mm DPN, pick up 21 stitches on the ribbing with right side facing.
row 2: (WS)knit
row 3: (RS)knit
row 4: k1, SSK, K until 3 stitches remain. K2tog, K1.
row 5: K
continue the last 2 rows until 5 stitches remain. with right side facing, begin i-cord.

Follow suggestions above for where to place the second ear flap and follow the same directions above for the second ear flap.

Ears:

Outer Ear (make 2).

With 5 mm needle and MC, cast on 10. Do 8 rows garter stitch (k each row).
Decreases:
row 1: k 1, SSK, knit until 3 stitches remain, k2tog, k1.
row 2: k
Repeat last row 1; 6 stitches remain. rather than knit another row, bind off.

Inner Ear (make 2).

with 5mm needles in CC, co 8. Do 6 rows garter stitch (k each row).
Decreases:
row 1: k1, SSK, K until 3 stitches remain, k2tog, k1.
row 2: k
row 3: repeat row 1; 4 stitches remain. rather than knit another row, bind off.

sew inner ear onto outer ear with the bottom flat side lined up and the inner ear centred on the outer ear. you’ll have two adorable ears which you must then sew onto the hat. this was a bit tricky to do evenly so give yourself some time. i tried to line them up with the cetre of the ear flaps, about 4 ridges or so from the top of the hat, but you may want to put them elsewhere. experiment. i sewed buttons onto the middle of the ears for fun.

I kept rough notes while creating this pattern and thought I’d share. If something is unclear or outright confusing, just email me and i’ll do my best to shed some light. ravelry link is here.


Tuesday, November 15, 2011

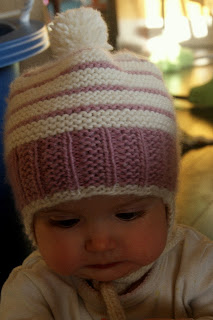
Garter Ribbing My Baby Hat!


Here's a simple baby hat that knits up quickly with a soft and lovely DK weight yarn. The pattern features a garter-ribbing, which is an interesting variation of the conventional rib that blends in perfectly with a classic garter stitch hat and ear flaps. Top it all off with an adorable pom-pom and your baby will be both irresistibly cute and warm when the snow flies.                           


Materials

-1 ball of Sublime Organic Merino Wool DK – Main colour (MC) is shade 0112 (cream)
-1 ball of Sublime Organic Merino Wool DK – Contrast colour (CC) is shade 189 (pinkish purple)
-3.5 mm 16 inch circular needle
-4 mm 16 inch circular needle AND Double Pointed needles
-stitch markers
-darning needle


ABBREVIATIONS:
MC – Main Colour
CC – Contrast Colour
K – Knit
P – Purl
K2tog – Knit two together
SSK – Slip Slip Knit
CO – Cast on

Gauge – 22 sts per 4 inches with 4 mm needles in garter-stitch should fit a 9 -12 month head (and even beyond) though there’s lots of room for play with baby hats…their heads grow so quickly that at some point, the hat will fit!

NOTE: the appearance of a “ridge” characterizes garter stitch, which you can observe after knitting a few rows. When i refer to a “ridge” I’m referring to 2 full rows of garter stitch (alternating K and P rows in the round; straight K stitches when knitting back and forth). 

Main Body of Hat

With MC and 3.5 mm needles, CO 76 stitches the join in round.
K 2 rows of garter rib as follows:

                row 1- *KKKP* repeat until end of round.
                row 2 - *KPPP* repeat until end of round.

repeat these last 2 rows for a total of 18 more rows.

Switch to MC and 4 mm needles and work the remainder of hat in garter stitch (K a row, P a row, repeat) and knit 3 full garter stitch ridges (or 6 rows alternating K and P, ending with a P row). Switch to CC and K one full ridge (2 rows). Repeat these steps (3 ridges of MC, 1 ridge CC) 2 more times for a total of 3 full repeats. Then, knit 3 more ridges of MC . Beginning in the next section, you will work one final ridge of CC, which is where you will start your decreases.

Decreases

You’ll be on a CC row now. Continue in colour pattern; reminders to switch colours will be indicated in italics.

row 1: (K2tog, K14, SSK, PM, K1, PM). repeat 4 times. 68 stitches remain.
row 2: P, slipping stitch markers as you go. DO THIS FOR ALL EVEN NUMBERED ROWS, IN THIS SECTION. 14 will be your last even row.
row 3: Switch to MC.(K2tog, K 12, SSK, PM, K1, PM). repeat 4 times. 60 stitches remain.
row 5: (K2tog, K10, SSK, PM, K1, PM). Repeat 4 times. 52 stitches remain.
row 7: (K2tog, K8, SSK, PM, K1, PM). Repeat 4 times. 44 stitches remain.
row 9: SWITCH to CC, (K2tog, K6, SSK, PM, K1,PM). Repeat 4 times. 36 stitches remain.
row 11: SWITCH to MC(K2tog, K4, SSK, PM, K1, PM). Repeat 4 times.  28 stitches remain.
row 13: (K2tog, K 2, SSK, PM, K1, PM). Repeat 4 times. 20 stitches remain.
row 15: (K2tog, SSK, PM, K1, PM). Repeat 4 times. 12 stitches remain.
break yarn, place on darning needle and weave yarn through the last stitches, secure.

Ear Flaps

if you look closely, you can tell where the beginning of the rows were (where the knit turned to a purl) as there is a line, or a break in the fluidity of the row. i attempted to centre this line in between the ear flaps but you don't need to be so picky. however, if pickiness is your thing, read on...  

with right side facing, begin the first ear flap by picking up stitches about one repeat of the garter-rib away from the beginning of the row. measure how long your ear flap ends up being (mine was 5 repeats of the garter rib). measure that distance PLUS the 1 repeat give from the centre line to determine where to start your second flap. hope this makes sense. if not, just experiment with it. it's the kind of thing you know how to do with practice.

row 1: with CC and 4 mm DPN, pick up 19 stitches on the ribbing with right side facing.
row 2: (WS)knit
row 3: (RS)knit
row 4: k1, SSK, K until 3 stitches before end of row. K2tog, K1.
row 5: K
continue the last 2 rows until 3 stitches remain. with right side facing, begin i-cord. knit i-cord to desired length.

make a pom-pom, then fasten to top of hat.

Please let me know if you have any questions about this pattern. i kept basic scratch notes while creating this hat and i haven't done any test-knitting yet. email me at lux.arnott@gmail.com if you need clarification. Ravelry link to the pattern is here.

Sunday, November 6, 2011

it's november!

so i'm at the in-laws and have snuck away to write a quick post because my baby is asleep on the bed in the next room and my son is playing with his cousin and i forgot my knitting needles...what better time to do a little typing!


so i've been doing a lot of thrift store shopping and have made LOTS of scores lately! cashmerino and angora yarn, whole seasons of deadwood (still have to catch up on this series which everybody raves about), amazing deals on kids clothes...and recently, these totally adorable plates! i couldn't resist. in our attempts to keep down on clutter (i can't escape clutter, i think it's in my genes), i'm swapping them for plates i already have, which i will donate. yay organization!


also, i wanted to post halloween photos! i found this great blog which inspired me to make my own cardboard thomas costume. like most 3 year olds, my son loves thomas and after seeing the lame assortment of thomas costumes available, i decided to create my own. here's the blog. and here's some photos. 


and finally, here's my latest knitting project. it took nearly 3 skeins of Cascade 220! lots of yarn. but lots of easy garterstitch. and it's one of the most gratifying projects i've ever knit! so comfy, so cute and so incredibly practical! the wind never sneaks into my neck anymore. i think i might be done with the toque/hat combo, at least on a day-to-day basis. this will be my go-to protection from the cold. the patter is called "loxley" and can be seen here on ravelry.


Wednesday, October 12, 2011

autumn

so it's officially my favourite time of year!! the transition from summer to winter...i love the colours, the smells and the chill in the air. as much as i love the warmth and life of summer, i admit that by the end of august i'm excited about pulling out the sweaters, toques, wrist-warmers, boots etc.


last week, my son and i picked leaves and set them aside to dry. then we took out some wooden beads that i bought at the victoria swappy a few months ago for super cheap and we strung them onto knotted string. he choose the colour scheme. then he and his teddy bear helped me clip the dried leaves onto the string and we hung them up today!


i just finished a sweater for myself. it was super-easy, just straight stockinette with simple increases and round knitting. i knitted it while the kids played in the grass and while watching true blood and curb your enthusiasm. does everyone agree that this season of true blood was by far the greatest? 


Saturday, September 10, 2011

september september, girl where you been so long?

among the many reasons we decided to buy land and build a house was to obtain our goal of being more self-sustaining. not because it’s trendy or whatever. but because of the cumulative effect of many shitty things like peak oil, peak soil, climate change, economic collapse, etc. which are kind of concerning. so together, we started to educate ourselves on gardening, food preservation, frugality, knitting, carpentry, etc…

this winter i would like to use as much peserved food as possible, (and as little grocery out-of-season food as possible) so i’ve been canning up a storm! every year i try to preserve more and more, and use less and less of the imported stuff. we have a HUGE crabapple tree and i’m doing just about everything you can do with crabapples, including jellies, mushes and juices. canning them whole is great for dessert as well. this year, i took a leap and canned jelly without commercial pectin…something veteran canners would do with little thought, but something about which i (a self-taught learner) have always been reluctant. it turns out i was afraid for nothing, because the result was great! i like doing things that require as little processed stuff as possible…

i bought 20 pounds of nectarines for 20 bucks today, and plan on canning those tomorrow.  i've already canned 20 pounds each of peaches and nectarines. also, i bought 20 pounds of pears for 25 bucks today and canned those. this is my first year canning pears and it's even more time consuming than peaches! hopefully the end product is worth it.
boiling crabapple juice!!

spoon test for ensuring the jelly is "done"


in other fascinating news we’re in the process of preparing a few new garden beds. unfortunately, our land is ROCKY, WEEDY and SANDY and the land needs lots of effort and energy on our part. it’s sort of like breaking in a pair of wooden shoes (or about as easy as convincing the masses that global warming exists). my father-in-law built a rock sieve, which operates with the use of elbow grease and gravity to sift through dirt, so we’ve been spending our days as of late hucking chunks of earth onto the medieval-looking contraption (doesn’t it look like some kind of torture chamber?) . 


notice the sifted sand versus the rock pile!! rar!
enormous pile of dirt which is being overtaken by weeds.
luckily, the enormous dirt pile through which we are sifting (which was set aside during the back-filling stage of our house building) also doubles as my son’s favourite play spot. he literally spends hours there digging around and getting dirty while we work the land (and our abs, our arses, biceps, pregnancy guts, etc). he is a much happier child when allowed unrestricted time out-doors to roam around, so dirt-hucking is a rather enjoyable experience for everybody involved.
prepared bed!
to build a bed, we loosened the existing dirt down about a foot, added another foot of sifted dirt, then topped it off with a delicious inch of city compost (we got it for free earlier this summer). we then planted some hairy vetch (a nitrogen fixing cover-crop, NOT a venereal disease!) which we’ll turn under in the spring. hopefully, this will partially prep the soil for next year. 

notice the rock boarder. my son created that...his very own "rock-train." those are just a fraction of the rocks that we dug up in the process. if you ever want to keep a kid busy, just come to my house, help us dig up rocks, and encourage the kid to build a "rock-train." i'm thinking of patenting the idea. "your child will stay out of your hair for hours!". the catch is that you have to build it in my back yard. come one, come all!

hmm…there’s someone shooting a gun outside right now. it’s pitch black out, what the hell are they shooting at?


Sunday, September 4, 2011

life

only have about 3 minutes to update this blog....here's a few photos of the latest knittng projects plus some photos of the house, which by the way, we're living in (yay!). i've had so little time to do anything but basically exist....we moved into our new house, which means we moved stuff from our old house AND my mum's house, where we were staying. and the whole process, with two young children in tow, was overwhelmingly time-consuming! 

now we just have to tame our yard, which is OUT OF CONTROL, which you can observe in the photo below. also take note of the huge southern exposure windows! we hope to use as little heat as possible this winter as the low southern sun shines its beauty indoors! we installed radiant floor heating (no forced-air furnace system!), with a super-efficient gas boiler that heats the water which runs through the floor (well, runs through tubing in the floor). 


and on to the knitting, of which there is little...
baby shorts


summer scarf

Saturday, June 4, 2011

diaper free!

for information on "natural infant hygiene" (aka "elimination communication" or "diaper free") go to http://www.diaperfreebaby.org/.


for the last 6 weeks, i have been putting my baby to bed with no diaper. that's right, no diaper...just her bare bum and a top. 


many of my friends/family know that with my first child, i enjoyed the benefits of placing my infant over the potty to catch his poos...(he pooed several times a day---after breastfeeding--- which is a lot of ass-wiping not to mention a lot of laundry when cloth diapering). i realized quickly the benefits of getting him to poo on a potty; namely, it resulted in less orange/stinky laundry, no shitty diaper leaks (mums, you know what i'm talking about...orange poo that comes UP the back of the diaper dirtying their entire outfit which gets IN their hair as you take the soiled onsie OFF, not to mention the necessary mid-day bath that follows), and perhaps most importantly, a cleaner bum for the baby (imagine having to sit in your own stool for even minutes at time? YUCK). i was really overwhelmed with my first child so i didn't worry a lot about catching pees...if i caught them, great. 


i caught his poos in the middle of the night with my first-born too until he stopped pooping at night...sometime between his 5th and 6th month. again, it was easier holding him over the pot in the middle of the night than changing a diaper at night. but i still diapered him at night otherwise. i was so sleep deprived, i didn't have it in me to experiment with no-diapers. once he stopped pooing at night, i stopped attempting to catch anything at night, savouring the sleep instead and letting the diaper do the work.


with my second baby, i decided to take "diaper-free" more seriously. i re-read "Diaper-Free: The Gentle Wisdom of Natural Infant Hygeine" by Ingrid Bauer and when baby was about 2 months old, decided i was ready to try going diaper-free at night. i anticipated a lot of stress...i got my bed totally prepared for countless leaks (an absorbent sheep-fleece, towels, extra blankets, pre-fold diapers, etc) closed my eyes tight with my daughter laying peacefully beside me and wondered: is this going to work? why am i crazy and insist on doing everything the difficult way?


imagine my surprise when on my first night, i did not miss a single pee? and imagine my surprise when i woke up from one of the better sleeps i'd had since she was born?


here's how it works. if you're a breastfeeding parent who co-sleeps (whether the baby is in the bed, on a mattress beside your bed, or in a crib beside your bed), you know that your baby wakes several times a night to feed anyway. in general, babies don't pee while asleep. the trick is, and it's simple: when your baby wakes to feed, hold baby over a receptacle on the side of your bed and she will pee. my daughter is now just over 3 months and i haven't used a diaper at night since (with the exception of the square pre-fold diapers i put under her bottom in case i miss a pee...which gets changed out swiftly and without fuss once i realize i've missed, which is usually almost right away). 


since i started, i have had misses. mostly because i sometimes can't rouse myself out of sleep in time to pick her up (although, at least 90% of the time, our sleep cycles are identical and i usually wake up a minute or two before she needs to feed). but i have a sheep fleece (that prevents urine from soaking through to the mattress) on which we sleep so if she pees before i get her (usually a minute or two passes before i realize she's awake and hasn't waited for me to pick her up), i simply pull out the cotton placed under her bum (like i said earlier, a prefold cotton diaper, an old towl, etc) and slip another one under her bum. DONE. i don't even have to turn on a light. or even sit up for that matter. even holding her on the potty does not require me turning on a light (i use the light emitting from my clock radio) because the metal bowl i use as her toilet is huge. turning on the light rouses her and makes it more difficult for her to settle so i'm thankful i don't have to use it.


even the most advanced cloth diaper and/or disposable diaper leaks. when i used diapers, i'd say that at least once or twice a week my daughter would leak and i'd have to change her sleeper. which is disruptive and annoying. now, there are no leaks...(just occasional misses, which i've explained is resolved quickly and efficiently).


further, she cries less at night...which directly results in me sleeping more at night...crying is almost eliminated entirely! she has always struggled with gas; her sleeper plus diaper prevented her from kicking/straightening her legs in attempts to pass the gas. such restriction set her off in a rage literally EVERY SINGLE NIGHT AT 3 AM (the recovery from which sometimes took an hour or two depending on how upset she got) until we went diaper/pj free. she has not had a single 2 hour gas-fit since we made the change. (the very act of holding a babies legs up over a bowl helps to pass gas in itself...doing this a few times a night helps the gas pass gradually over the night rather than accumulating to the point of unbearable discomfort). when she doesn't cry, i don't stress: when i don't stress, i get back to sleep right away.


also, imagine sitting in a urine soaked, unbreathable plastic diaper all night (whether it's an expensive pocket diaper that uses microfibre...an oil/petro-chemical product...or a disposable diaper, which uses plastic). imagine how much nicer it is to let your bits and pieces air out while you slumber! especially for a girl...think of pathogens that thrive in moist environments, short urethras, etc.


finally, i'll mention the obvious...going diaper free at night reduces the number of diapers you need. if you cloth diaper, this means several diapers and several changes (unless you're using a pocket diaper like fuzzy bunz, in which case, you'll still save diapers but not as many). if you use disposables, this method will save you approximately 2-3 diapers a night, depending on whether your little one poos, is a heavy wetter, etc. this results in huge $$ savings.


anyway the point of my post is NOT to give the impression that "my way is the best" or to cast judgement on those that use diapers at night. the use of diapers is the norm in our society and there is little wisdom to help mums with any alternatives. in fact, the use of disposables has only become the norm in the past several decades...humans have been around a lot longer than that. the point of my post is to offer another perspective and to help out any mums who might be interested in trying this out. if anyone reading this wants to learn more, email me at hotsaki_7@hotmail.com and i'll do my best to shed some light. 


i thought i'd add that my mattress has never been soaked once, and i've been doing it for 6 weeks. i even did it when i was out of town for a week. i've never been shat on (though i've been peed on once...not really a big deal, pee is sterile and the incident occurred in the morning when i was too lazy to move my ass and get her on the potty in time). my daughter is used to our rhythm: wake up (she does not cry...she merely shimmies and i'm usually waking up from a sleep cycle anyway---see above re: coinciding sleep cycles---), drowsily pee on a potty, drink milk, and drift back to sleep. all of this happens almost without waking in a matter of minutes. if you're waking up already to breastfeed, it's only one other step that literally takes an additional 15 seconds. it's brilliant really, and so simple. many cultures have been doing it this way since the dawn of time. i often think my grandma and her 12 children...in her little village in greece, there were no diapers. i imagine she must have done it something like this...too bad i never got to meet her and ask...


Saturday, May 28, 2011

so busy

here's what i've been upto lately knitting wise. i don't have much time anymore as baby is getting bigger (3 months!), toddler is getting challenging (tantrums, obnoxious behaviour etc) and...yah, that's basically it. oh and we're still building a house. we just got back from the lower mainland where we visited family and bought our cabinets. so we're installing them now, as well as baseboards, trim etc. it's almost entirely painted! when the place is less of a mess, i'll post photos. 

i'm definitely feeling the, oh i don't know the word, hmm....commitment? of having 2 children. like i have no time for myself anymore. and i wont complain extensively, life with two children is mostly good. but basic things...like fighting to have showers, not having time to exercise, sneaking in a few pages here and there of reading but nothing else, almost not knitting at all, delayed responses to emails, wishing i got more sleep. oh, and yes so typical, looking like crap all the time. and i know it'll be over soon so i try...really hard... to stay present and focused and enjoy them while they're young...because before you know it, they wont need me nearly as much and i'll have time to do all the things i long to do now. 

in the mean time, here's some photos of some of the craftiness i've been upto lately. oh and my previous post included photos of my latest design. i've had thousands of hits to my page with people looking at the pattern...i feel so honoured that people actually time out of their day to check it out! 


Tuesday, April 19, 2011

yum, ice cream in the sping time!!

chocolate, strawberry and vanilla please


here’s a simple and quick garter stitch pattern for wrist warmers using straight needles and knitted flat with simple seaming at the end of the project.
the gauge is just a suggestion as there’s lot of room for variation. because these are quite fitted as described in the pattern, the needle size could easily increase to 4 mm and still fit most wrists. also, the striping pattern is just a suggestion…be creative and adjust the length, striping pattern etc.
this pattern calls for 3 different coloured worsted weight yarns with minimal amounts of contrast colour. try using scrap yarn to save yourself buying whole skeins.
this pattern was designed with a newborn in my arms; therefore there may be mistakes. please send me an email through ravelry or at lux.arnott@gmail.com.


materials: 


size 3.25 needles (or size necessary to obtain gauge)
stitch holders
darning needle
2 buttons...3/4 inch maybe? again, give or take.
your preferred worsted weight wool. i used PATONS CLASSIC WOOL in 3 different colours: Chestnut Brown (MC), Natural Mix,(CC1)  and Orchid (CC2)


GAUGE: approx 22 sts per 10 cms/4 inches in garter stitch when knitted on 3.25 mm needles...give or take. gauge isn't horribly important in this pattern as it's in garter stitch which is very accommodating. these mitts fit both my small wrists and my sister's bigger wrists. making them a bit looser would work well for fitting over a sweater. otherwise they're designed mostly to fit under sweaters or with short sleeves.


note: it's not necessary to follow this pattern literally...add stripes wherever you want (or knit solid) and adjust the length to your liking. i think there were about 38 ridges overall before i increased for the thumbs. i provided the literal directions for those who liked the way i did it but i encourage you to do it your own way.


also note: with garter stitch, one "ridge" is actually two rows. i write the pattern referring to ridges because they're easier to keep track of. 38 ridges is 76 rows.


-cast on 40 sts in MC
-Knit
-switch to CC1 and knit 1 ridge
-switch to MC and knit 1 ridge
-switch to CC2 and knit 3 ridges
-switch to MC and knit 4 ridges
-switch to CC2 and knit 1 ridge
-switch to MC and knit 1 ridge
-switch to CC2 and knit 1 ridge
-switch to MC and knit 2 ridges

- colour-work row: alternate CC2 and MC stitches (i.e. knit one pink stitch then knit one brown stitch, knit one pink, knit one brown and continue doing this until the end of row row). do the same on the way back but opposite;  knit a pink stitch into the brown stitch and knit a brown stitch into the pink stitch etc etc. 

- switch to MC and k 8 ridges***(explanation for *** below)
- repeat colour work row
- switch to MC and knit 2 ridges

THUMB INCREASES

row 1: K1, M1, K until 1 stitch remaining. M1, K1
row2:  Knit
row 3: K2, M1, k until 2 stitches remaining. M1, K2.
row 4: Knit
row 5: K3, M1, K until 3 stitches remaining. M1, K3. 
row 6: Knit
row 7: K4, M1, K until 4 stitches remaining. M1, K4.
row 8: Knit
row 9: K5, M1, K until 5 stitches remaining. M1, K5. 
row 10: knit 
row 11, 12: switch to CC1 and knit one ridge total...NO increases (in other words, knit two rows straight).
row 13: K6, M1, K until 6 stitches remaining. M1, K6. 
row 14: Knit
row 15 and 16: REPEAT rows 11 and 12. 
row 17: K7, M1, K until 7 stitches remaining. M1 K7.
row 18: knit 
row 19: knit to last 7 stitches, then slip these remaining 7 stitches onto stitch holder. 
row 20: knit to last 7 stitches, then slip these remaining 7 stitches onto stitch holder. 40 stitches should remain.

- knit 3 ridges straight in MC
- knit 3 ridges in CC2
- knit 1 ridge in MC
- knit 1 ridge in CC1
- knit 2 ridges in MC
- knit 1 ROW in MC
- BO loosely

SEAMS AND BAND

- sew a seam from the top of the mitt to the thumb.
- transfer slipped stitches onto a needle and start knitting the row. when you get to a gap in the middle, pick up 2 stitches, then proceed to knit the rest of the stitches. knit two more ridges. knit 1 row, then BO.

now knit the band:


with the right side facing you, pick up 6 stitches evenly in the middle of the large brown chunk of the mitt (***remember above when you knit 8 ridges of brown? start picking up at the second brown ridge from the bottom keep picking up until the 2nd ridge from the top. hope that makes sense). NOTE when you pick up these stitches, there should be a little seam formed on the wrong side of the mitt. you'll need this seam later for sewing up the mitt. knit 10 ridges (this forms a long slender band). make button hole by knitting 2 stitches, binding off 2, and then knitting the last 2 stitches. on the next row, knit 2, CO2, K2. knit 1 more ridge. knit 1 more ROW, then BO.

now sew up the remainder of the mitt, beginning at the bottom, all the up to the top of the thumb. sew on button. repeat entire process again but sew button on opposite side of mitt. done!!!


PLEASE LET ME KNOW IF THE DIRECTIONS ARE UNCLEAR OR IF YOU HAVE ANY QUESTIONS OR IF I MADE A MISTAKE (i don't know why i felt like yelling this message out, but there you have it). i'm scattered and rarely do things right the first time. especially right now with a new born :s


oh and if you want to use this pattern to make projects for profit, please ask first :)

Sunday, April 3, 2011

well john, i DO believe in zimmerman!!

elizabeth zimmerman that is!

she is a genius. for those that don't know her, she's a knitting goddess. born in the thirties in europe, she moved to america at a young age and changed the way the world looks at knitting (or, at the very least, she changed the way that i looked at knitting). she challenged the notion that one must follow patterns, sew seams, and purl. and for this i'm grateful.

she does not hold your hand while knitting; rather she provides guidelines and leaves you to figure the rest out. she fosters independence by discouraging any sort of reliance on knitting "experts" and blind acceptance of knitting "rules" (e.g. that one must sew all pieces of a sweater together) and shows you how to draw upon your own creativity with basic math skills. she teaches you to nut up, stop making excuses and get to work.   

she taught me to have a relaxed attitude toward knitting, gain independence in my knitting, have confidence in my knitting and fix mistakes in my knitting (as opposed to crying about it, throwing massive temper-tantrums, doing nothing to fix the mistake, and starting all over). these lessons have transfered into my real life as well; she helped me unlearn the lessons that years of formal education taught me...that i am indeed a competent human being and that i can do shit myself as opposed to a lame minion who must follow the rules laid out for me. that i can dictate my own fashion and call all the shots.i'm certain that she has indirectly helped me overcome my drive for perfection by teaching me that perfection in knitting (and in life) is absolutely silly and ridiculous. i learned to loosen up my tension as i knit and simultaneously, learned to loosen up in life as well.

thanks EZ, you are definitely one of my heros...if i could choose one person that i could sit and have a conversation with, it would be you. you rebellious knitting punk genius you. rar.

the two following pictures are projects of hers which i have individualized and tailored to my children. 


these are diaper pants made for my new baby. they fit beautifully over her oversized cloth-diapered ass.


this is my third of three tomten jackets (the other two can be viewed here)

Tuesday, March 29, 2011

apron strings

i recently stumbled upon this awesome blog: http://apronstringz.wordpress.com

due to lack of time, i can only say that this blogger's philosophies mesh with mine and so i love reading it. check it out if you're into the art of home-making. 


also, this article (which i found on her blog) is rad: http://www.yesmagazine.org/happiness/meet-the-radical-homemakers

gotta go! really really fussy baby...

Monday, March 21, 2011

bad hair days

bad hair days come with being a parent. especially a parent of 2. within a couple of months of having my first child, i shaved my head to save myself the hassle of maintaining hair. which was great. and incredibly liberating but i thought i'd try a different strategy this time because growing out hair from short to long is, admittedly, about as appealing as eating toe-nails. someone else's toe-nails no less. there is always an inevitable "ugly phase". these days, time goes by so quickly that i never seem to be able to get everything done...let alone my hair. i anticipated that this would happen prior to giving birth to baby #2 so just before the big day arrived, i knitted this simple head band which can be found here on ravelry. it took 2 or so hours to complete. it doubles as an eye mask when taking necessary afternoon naps in brightly lit rooms.

my baby is no longer new-born as she had her 5 week birthday today. she's getting so fat, quickly accumulating leg rolls that took my first born a couple of months to develop...so cute. oh sweet boob juice. yum. 

it's really hitting home that i will never have a newborn again (it is my intention to have completed my commitment to the manufacturing and delivery of tiny humans...life may have other plans but i'll cross that bridge when and if i come to it). i recently packed up all my newborn clothing in a bag for donation, whereas last time, i packed them away in storage knowing that another baby would come one day. i'm relieved and also really sad to be giving this stuff away. relieved because i do want to carry on with my life (grad school? master gardener? professional knitter?) and enjoy fully the two babies that i have; but sad because each day that passes i'm floating that much further away from that particular era of my life. i'm a sentimental sappy sucker and as such, a tear spills from my eye when i think of my departure from that complicated place of mothering small children.

i never thought i'd say this but IF the world wasn't so over-populated (each human requires an absurd amount of fossil fuel and other resources to sustain it), and IF life wasn't so expensive (a 3rd child means a mini-van, possibly a bigger house, way more expenses...think of the cost of even a modest calendar of activities) and IF our modern world supported families more (i.e. 1- didn't scorn women who bear more than two children; 2 - didn't expect mums, who choose to prioritize their children over their career, to remain home alone with children all day without contact with other adults for days at a time (because chances are, their friends/family work full-time) and/or attend "mum-groups" which tend to have rigid schedules and a general lack of real intimacy...groups that are intended to replace aforementioned friends/family who are good citizens and have full-time work, which is the expectation and ultimate goal of life these days...why, i have no idea; 3 -  didn't make it almost necessary for there to be a double income to maintain the "necessities" of life etc)...IF all of these things...i might actually consider a 3rd child. fucking crazy, right? this coming from a person who, just 5 years ago, doubted she would ever have children. it's addicting. kinda like tattoos, or so i'm told. more babies, more love, more cuddles. yesss....but in my case no...

in other news. i had my first glass of red wine today in months!! (yes, i am aware that i am nursing and no i am not worried about it). my sister S and i made dinner tonight...an amazing pasta dish made with balsamic mushrooms and red peppers, olives, sundried tomatoes, basil, etc. we paired it with a spinach salad with home-made candied pecans, strawberries and raspberry vinagrette. spending time with my sis while preparing the meal was almost as fun as eating it together with the family. i will miss her this summer when she moves away to be with her love in saskatchewan...living with her for the past several months has been so much fun. 

the last episode of 'big love" aired lastnight. i haven't had a chance to see it yet (see above re: having no time) but i'm sad to see it go. i liked how the show provided many complex views of polygamy and the drama was delicious. big love, i will miss you. 

what the hell am i doing. i should be sleeping. GOOD NIGHT!