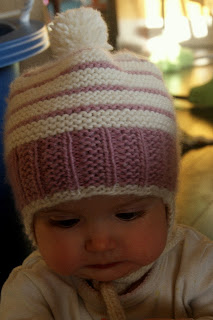
-1 ball of Sublime Organic Merino Wool DK – Main colour (MC)
is shade 0112 (cream)
-1 ball of Sublime Organic Merino Wool DK – Contrast
colour (CC) is shade 189 (pinkish purple)
-3.5 mm 16 inch circular needle
-4 mm 16 inch circular needle AND Double Pointed needles
-stitch markers
-darning needle
ABBREVIATIONS:
MC – Main Colour
CC – Contrast Colour
K – Knit
P – Purl
K2tog – Knit two together
SSK – Slip Slip Knit
CO – Cast on
Gauge – 22 sts per
4 inches with 4 mm needles in garter-stitch should fit a 9 -12 month head (and even beyond) though there’s
lots of room for play with baby hats…their heads grow so quickly that at some
point, the hat will fit!
NOTE: the appearance of a “ridge” characterizes garter
stitch, which you can observe after knitting a few rows. When i refer to a
“ridge” I’m referring to 2 full rows of garter stitch (alternating K and P rows
in the round; straight K stitches when knitting back and forth).
Main Body of
Hat
With MC and 3.5 mm needles, CO 76 stitches the join in round.
K 2 rows of garter rib as follows:
row
1- *KKKP* repeat until end of round.
row
2 - *KPPP* repeat until end of round.
repeat these last 2 rows for a total of 18 more rows.
Switch to MC and 4 mm needles and work the remainder of hat in garter
stitch (K a row, P a row, repeat) and knit 3 full garter stitch ridges (or 6
rows alternating K and P, ending with a P row). Switch to CC and K one full
ridge (2 rows). Repeat these steps (3 ridges of MC, 1 ridge CC) 2 more times
for a total of 3 full repeats. Then, knit 3 more ridges of MC . Beginning in the next section, you will work
one final ridge of CC, which is where you will start your decreases.
Decreases
You’ll be on a CC row now. Continue in colour pattern; reminders to switch colours will be indicated in italics.
row 1: (K2tog, K14, SSK, PM, K1, PM). repeat 4 times. 68
stitches remain.
row 2: P, slipping stitch markers as you go. DO THIS FOR ALL EVEN NUMBERED ROWS, IN THIS SECTION. 14 will be your last even row.
row 3: Switch to MC.(K2tog, K 12, SSK, PM, K1, PM).
repeat 4 times. 60 stitches remain.
row 5: (K2tog, K10, SSK, PM, K1, PM). Repeat 4 times. 52
stitches remain.
row 7: (K2tog, K8, SSK, PM, K1, PM). Repeat 4 times. 44
stitches remain.
row 9: SWITCH to CC, (K2tog, K6, SSK, PM, K1,PM). Repeat 4 times. 36
stitches remain.
row 11: SWITCH to MC(K2tog, K4, SSK, PM, K1, PM). Repeat 4
times. 28 stitches remain.
row 13: (K2tog, K 2, SSK, PM, K1, PM). Repeat 4 times. 20
stitches remain.
row 15: (K2tog, SSK, PM, K1, PM). Repeat 4 times. 12 stitches remain.
break yarn, place on darning needle and weave yarn
through the last stitches, secure.
Ear Flaps
if you look closely, you can tell where the beginning of
the rows were (where the knit turned to a purl) as there is a line, or a break
in the fluidity of the row. i attempted to centre this line in between the ear
flaps but you don't need to be so picky. however, if pickiness is your thing, read on...
with right side facing, begin the
first ear flap by picking up stitches about one repeat of the garter-rib away
from the beginning of the row. measure how long your ear flap ends up being
(mine was 5 repeats of the garter rib). measure that distance PLUS the 1 repeat
give from the centre line to determine where to start your second flap. hope this makes sense. if not, just experiment with it. it's the kind of thing you know how to do with practice.
row 1: with CC and 4 mm DPN, pick up 19 stitches on the
ribbing with right side facing.
row 2: (WS)knit
row 3: (RS)knit
row 4: k1, SSK, K until 3 stitches before end of row. K2tog, K1.
row 5: K
continue the last 2 rows until 3 stitches remain. with
right side facing, begin i-cord. knit i-cord to desired length.
make a pom-pom, then fasten to top of hat.
Please let me know if you have any questions about this pattern. i kept basic scratch notes while creating this hat and i haven't done any test-knitting yet. email me at lux.arnott@gmail.com if you need clarification. Ravelry link to the pattern is here.


